Introduction
This guide will describe the different steps you have to take to install spotweb on a Synology NAS.
This indexer can then be used as an indexer with sickbeard and couchpotato.
The device I’m using is a DS112+ with DSM 4.1.2636
I basically followed this guide here , adding my comments to it as we go along.
I also assume you have already activated ipkg which will allow you to install additional packages and known how te connect to the synology nas using ssh. If not there are plenty of guides out there, look for some links in previous posts.
Step 1 : installing additional packages
First make sure you are going to download the most recent packages by updating ipkg
ipkg update ipkg upgradeInstall git, this is a version control client that will allow you to checkout and update the spotweb code. Also install textutils a package used by git.
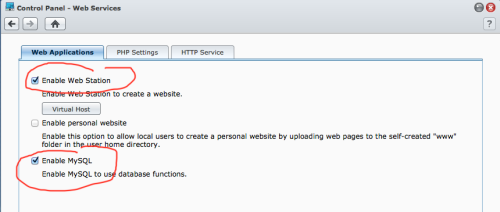
ipkg install git ipkg install textutilsStep 2 : Activate a web server and database on your synology
Use a browser to connect to the DSM web interface. Go to Control Panel -> Webservices.

Step 3 : Checkout the spotweb code using git
Go back to the command line console (ssh). Checkout the spotweb code in the path used by the webserver (/volume1/web)
cd /volume1/web git clone git://github.com/spotweb/spotweb.git /volume1/web/spotwebCloning into '/volume1/web/spotweb'... remote: Counting objects: 26557, done. remote: Compressing objects: 100% (5971/5971), done. remote: Total 26557 (delta 20542), reused 26148 (delta 20193) Receiving objects: 100% (26557/26557), 5.59 MiB | 1.57 MiB/s, done. Resolving deltas: 100% (20542/20542), done.
Step 4 : Setting up the database
These instruction will setup the database using commandline instructions, alternatively you could also use phpMyAdmin if you like.
If you never created a initial password for the mysql database (or forgot about it), do this:
/usr/syno/mysql/bin/mysqladmin -u root password NEWPASSWORDStart the mysql commandline interface
/usr/syno/mysql/bin/mysql -pCreate the spotweb table, user and priviledges
mysql> create database spotweb;Query OK, 1 row affected (0.00 sec)mysql> create user ‘spotweb’@’localhost’ identiefied by ‘password’;
Query OK, 1 row affected (0.00 sec)mysql> grant all privileges on spotweb.* to spotweb @’localhost’ identified by ‘password’;
Query OK, 1 row affected (0.00 sec)mysql> quit;
Bye
Step 5 : configure spotweb
Connect to the new spotweb installation using your favored browser.
http://<synology-ip>/spotweb/install.phpThe first page will check if php is installed correctly, if so proceed to the next page.
Here you have to enter the database, user and credentials
Next page enter your usenet server credentials

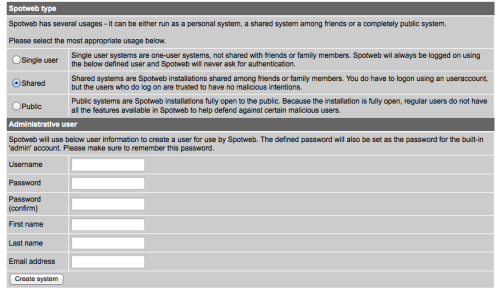
Next create a admin user with credentials that will allow you to logon to the spotweb web interface

The information that is displayed next is needed for some additional configuration. Copy the information and save it somewhere.
<?php
$dbsettings['engine'] = 'mysql';
$dbsettings['host'] = 'localhost';
$dbsettings['dbname'] = 'spotweb';
$dbsettings['user'] = 'spotweb';
$dbsettings['pass'] = 'password';
From the command console, create a new directory
mkdir -p /volume1/web/.spotwebcreate a new file in this directory with nano or vi called dbsettings.inc.php
nano /volume1/web/.spotweb/dbsettings.inc.phpcreate a symbolic link of this file to the spotweb installation
cd /volume1/web/spotwebln -s ../.spotweb/dbsettings.inc.php dbsettings.inc.php
Logon in the spotweb user interface and goto Config -> Settings (right top screen)
Goto the Retrieve tab and configure the retention you would like. (Default is everything)
There is a retrieve button on the main page to start the retrieval process, or you can run this command from the command line.
cd /volume1/web/spotweb /usr/bin/php retrieve.phpFirst time retrieval will take a long time depending on the settings you chose and the retention of the newsserver in question.
Step 6 : Configure Newznab
In order to use spotweb as a newznab source, we need to make some changes to the apache configuration.
Edit httpd.conf-user
nano /usr/syno/apache/conf/httpd.conf-userAfter <Directory “/var/services/web”> …… </Directory> add these two lines
# Include external config
Include /volume1/@appstore/.apache_conf/apache.conf
Create the .apache_conf directory
mkdir /volume1/@appstore/.apache_confDownload some files from dropbox
wget -O /volume1/@appstore/.apache_conf/apache.conf http://dl.dropbox.com/u/5653370/syn_files/apache_conf/apache.conf wget -O /volume1/@appstore/.apache_conf/spotweb.conf http://dl.dropbox.com/u/5653370/syn_files/apache_conf/spotweb.confThe spotweb.conf file contains some ip authorizations to subnet 192.168.2.0. It could be that you need to change this if you are on a different subnet.
E.g.
Allow from 10.0.0.0/24or if you want to add access from a single pc
Allow from 192.168.1.17After creating or modifying the apache config you need to restart the Apache webserver to activate the new configuration.
/usr/syno/etc.defaults/rc.d/S97apache-user.sh restartAdd an access file to allow connection using the newznab API
wget -O /volume1/web/spotweb/.htaccess http://dl.dropbox.com/u/5653370/syn_files/spotweb/htaccess.txt
Test the configuration with this URL, it should return an xml file.
http://<synology-ip>/spotweb/api?t=cStep 7 : Automatic retrieval of spots and updates
Setup the necessary scripts for the automatic updates
mkdir /volume1/@appstore/scripts wget -O /volume1/@appstore/scripts/spotweb_upd.sh https://dl.dropbox.com/u/5653370/syn_files/spotweb/spotweb_upd.sh –no-check-certificatechmod a+x /volume1/@appstore/scripts/spotweb_upd.sh
wget -O /volume1/@appstore/scripts/spotweb_retr.sh https://dl.dropbox.com/u/5653370/syn_files/spotweb/spotweb_retr.sh –no-check-certificate
chmod a+x /volume1/@appstore/scripts/spotweb_retr.shwget -O /volume1/@appstore/scripts/spotweb_cron_upd.sh https://dl.dropbox.com/u/5653370/syn_files/spotweb/spotweb_cron_upd.sh –no-check-certificate
chmod a+x /volume1/@appstore/scripts/spotweb_cron_upd.sh
wget -O /volume1/@appstore/scripts/spotweb_cron_retr.sh https://dl.dropbox.com/u/5653370/syn_files/spotweb/spotweb_cron_retr.sh –no-check-certificate
chmod a+x /volume1/@appstore/scripts/spotweb_cron_retr.sh
Add two jobs to the cron configuration
Editing the cron configuration can be tricky, between all parameters there has to be a TAB (no spaces). The command itself however is a considered a single parameter and contains spaces. Basically use tabs before ‘/bin/sh’ and spaces after ‘/bin/sh’.
Add these two lines (if there are other lines in the cron configuration file already, leave them intact)
#minute hour    mday    month   wday    who     command
15      */6     *       *       *       root    /bin/sh /volume1/@appstore/scripts/spotweb_cron_upd.sh > /dev/null
0       */2     *       *       *       root    /bin/sh /volume1/@appstore/scripts/spotweb_cron_retr.sh > /dev/null
Restart the Cron daemon afterwards.
/usr/syno/etc/rc.d/S04crond.sh stop
/usr/syno/etc/rc.d/S04crond.sh start
Each two hours spotweb will be updated, you can check this in the webinterface. Last update timer is show above the Retrieve button on the main page.
Step 8 : Setup Couchpotato
First determine an apikey, you can use the one of the admin user or create a new user for this.
Click the user on the top right in the webinterface and open the ‘change user’ panel. You will find the apikey on the bottom.
Go to Couchpotato configuration panel -> Nzb Providers and add a new newznab provider. Don’t forget to add your apikey.
Test it by turning off all other Nzb Providers.


When executing this line of code:
mkdir /volume1/@appstore/scriptswget -O /volume1/@appstore/scripts/spotweb_upd.sh https://dl.dropbox.com/u/5653370/syn_files/spotweb/spotweb_upd.sh –no-check-certificate
I get error: mkdir: invalid option — O
You are right, that should be two lines.
mkdir /volume1/@appstore/scripts
wget -O /volume1/@appstore/scripts/spotweb_upd.sh https://dl.dropbox.com/u/5653370/syn_files/spotweb/spotweb_upd.sh –no-check-certificate
There is a problem with the auto retrieve. Either using your script, or writing my own, i always get the Permission Denied error. I set up the cronjob, and the schedule task within DSM. Both don’t work.
Did you set the execute flag on the scripts?
Check with this command:
ls -la /volume1/@appstore/scripts/
the spotweb scripts should have these flags:
-rwxr-xr-x
if not, fix it with this command:
chmod 755 /volume1/@appstore/scripts/spotweb*.sh